Google Ad Grants: The Ultimate Guide [2024]
Managing a Google Ad Grants account is NOT like managing any other Google Ads account. There are specific strategies and account limitations you need to take into account.
This blog is a complete step-by-step guide to setting up, managing and optimising your Google Ad Grant account.
This guide is for you if:
- You are entirely new to Google Ad Grants
- You have a brand new Google Ad Grants account and are not sure how to get started – jump ahead to creating a plan
- You have an existing Google Ad Grants account and want to improve its performance.
Let’s dive in and help you get the most out of your account. There is a lot to get through, so bookmark this page so you can find your way back.
Part 1: About Google Ad Grants
What is Google Ad Grants?
Google Ad Grants is a program that gives qualifying charities up to US$10,000 worth of advertising to spend on Google Search ads every month!
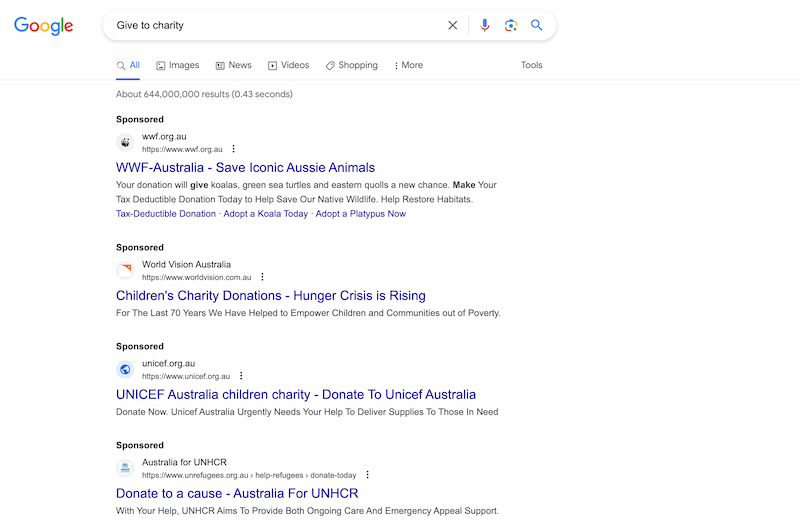
Search ads are these links labelled “Sponsored” that appear at the top of Google search results, and sometimes at the bottom as well.
It’s a huge opportunity to drive a ton of traffic to your organisation’s website.
What’s the catch? There really isn’t one, but there are a few limitations on a Google Grant account that means it can’t be used as any other Google Ads account.
What are the eligibility requirements for Google Ad Grants?
The Google Ad Grants eligibility requirements will depend on the country your charity is set up in and your charity’s circumstances.
Generally, your organisation will be eligible if:
- You are registered as an official charity in one of these countries and are NOT a:
- Governmental entities and organisations
- Hospitals and medical groups
- Schools, childcare centres, academic institutions and universities
- You have a high-quality website that meets the Google Ad Grants eligibility requirements. You may need support to get your website ready for your Google Ad Grant: Get in touch to find out how we can help.
How to apply for Google Ad Grants
Applying for Google Ad Grants is usually quick and easy.
- First, you need to apply for Google For Nonprofits and then wait to be approved.
- Log in and find Activate Products under Google Ad Grant; you will be taken through a short form to apply.
- Once you have been approved, you will receive an invitation to the email you used for the application. Follow the instructions in the email to accept invitations to the payment profile and account.
Once your account is approved, you are ready to start setting up campaigns.
Part 2: Setting up your first campaigns
Step 1: Create a plan for your Google Ads Grants account
Before you jump into setting ads is a good idea to come up with a plan of what you are trying to achieve and how you will structure your account.
You can only use your Google Ad Grant account to create search campaigns, not display, shopping, video or any other campaigns available in regular Google Ad Accounts.
You should define your digital marketing goals and think about how you can use your Google Ad Grant to meet your goal.
Some goals you could support:
- Fundraising
- Lead generation
- Raising awareness about your charity and its impact.
Account structure basics
The basic elements of your Google Ad Grant account are Campaigns, Ad Groups and Ads.
Different settings are configured at different places, affecting how you structure your account. The basics ones to know are:
| Campaign | Ad Group | Ads |
|---|---|---|
| Goal | Keywords | Headlines |
| Location targeting | Descriptions | |
| Language | Extensions | |
| Budget | ||
| Bidding |
You can structure your ads account in any way that makes sense for you. But you must have two ad groups in every campaign.
A common way for a nonprofit to structure its Google Ad Grant account is to have a campaign for each marketing goal, several ad groups with closely related keywords and one responsive search ad.
| Campaign | Ad Group | Ads |
|---|---|---|
| Generate awareness | ||
| Generate leads | ||
| Generate donations |
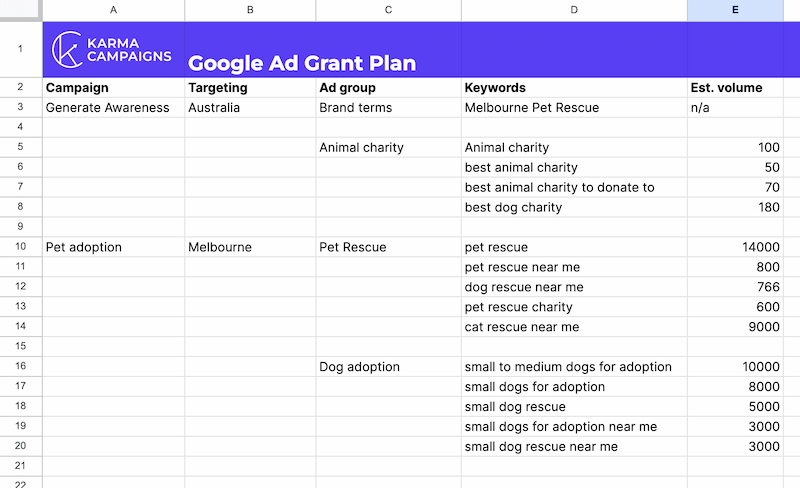
It’s a good idea to plan out your campaigns in a spreadsheet.
You can start by filling in the details for an ad group for searches of your organisation’s name – this is called a brand campaign. You can include any common misspellings.
It should look something like this:

You should target the area your ads are relevant for. Google provides this guidance on the policy for Google Ad Grant targeting.
Now it is time to jump into some keyword research for your Google Ad Grant Account.
Keyword research for your Google Ad Grants
Firstly, let’s talk about what a keyword is: A keyword is the selected term that we use to target our ads.
This is slightly different from a search term, which is the actual words or phrases users enter into search engines to find information or solutions.
There are a couple of Google Ad Grant rules related to keywords that you need to follow:
- No single-word keywords are permitted.
- No overly generic keywords are permitted.
- No names of other organisations.
There are a couple of exemptions, so it’s a good idea to review the policy.
With those in mind, it’s time to jump into some keyword research.
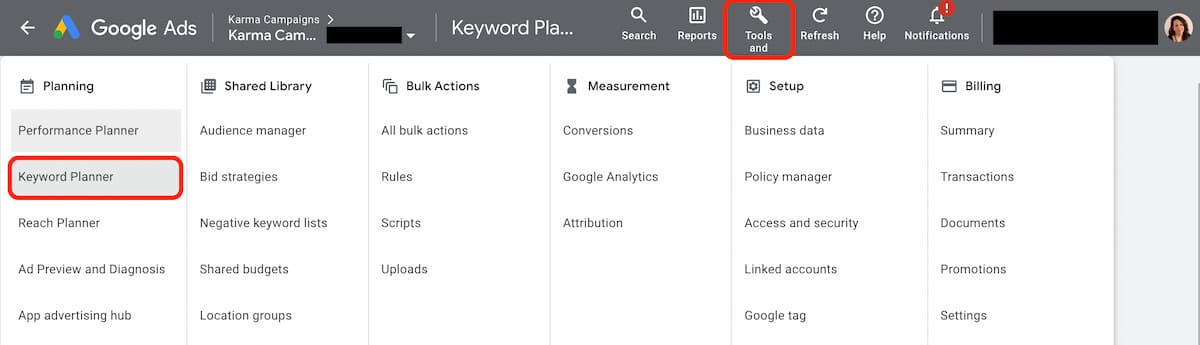
Google Ads Keyword Planner
The first place to start with your keyword research is the Google Ads Keyword Planner tool. You will find this in your Google Ad Account here:
You can either enter your website to generate keywords or input keywords to find search volume.
It’s important that your website has relevant content for the keywords you target. For that reason, you may want to start with your website or use your website to filter results.
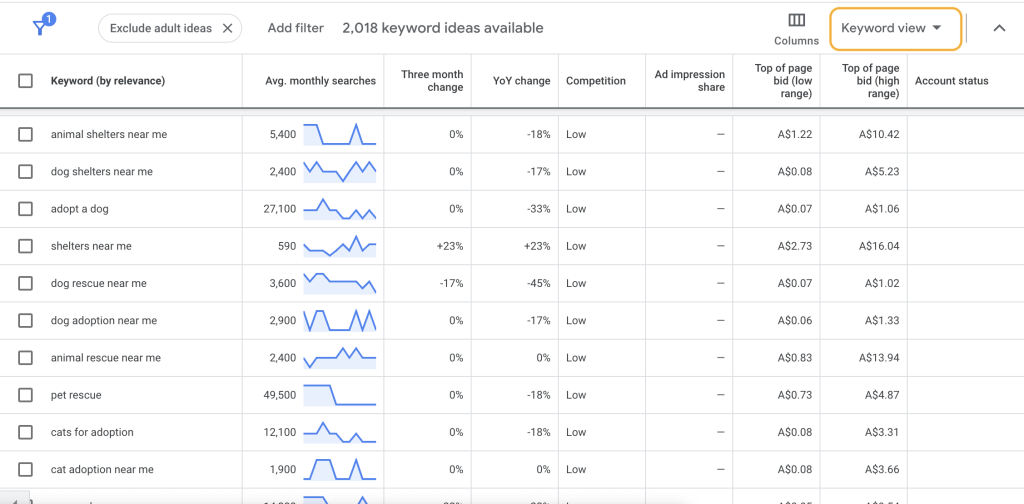
You should end up with results that look something like this. You want to look for words that have a high volume of searches (Avg. monthly searches) that are relevant to what your organisation does.
If you toggle the Keyword view dropdown to Grouped view, it will arrange them in themed ad groups ready to put into your Keyword plan.
Your Google Ad Grant plan should start to look something like this:
Keyword Planner sometimes excludes data on ‘sensitive’ topics. You may see no results if your charity works in one of these areas. If this is the case, you will need to use another tool, such as Semrush.
Semrush
If you want to save some time and effort with your keyword research, you should consider using Semrush.
Semrush is a paid tool, however, you can start your keyword research with an extended 14-day trial.
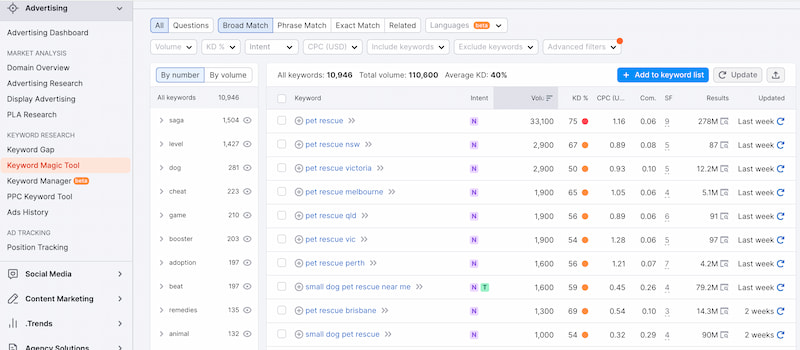
Like Google Keyword Planner, Semrush provides data on search keywords and volume but pulls the data from a larger range of sources. It helps you find a huge range of related search terms, and its better at grouping keywords into themes than Google Keyword Planner.
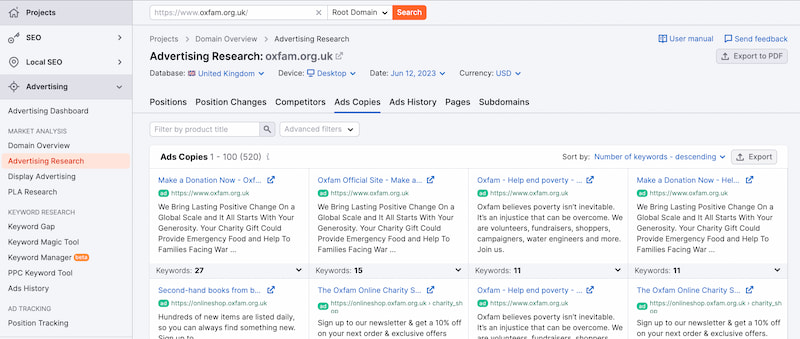
There is also a whole range of competitor research tools that will let you see ads of organisations that work in your space and identify the keywords they are targeting.
FAQs about Google Ad Grants keyword research
Step 2: Setting up your first ads
By now, you should have a solid plan for your campaigns and keywords. It’s time to set up your first campaign.
Google Ads is constantly changing, so your interface might not look exactly like this. However, there are some important settings to look out for as you set up your ads.
To get started, find a button that says New campaign.
Campaign objective
First up, you are going to be asked your campaign objective.
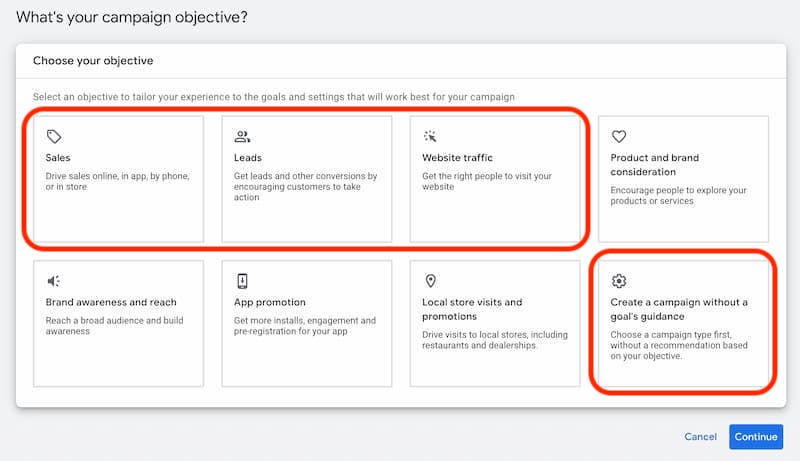
This setting helps Google Guide you through the setup and give you optimisation suggestions. As you can only use a grant account to create search campaigns, you need to select Sales, Leads, Website traffic, or Create a campaign without a guidance goal. Choose the goal that best aligns with the campaign you are creating.
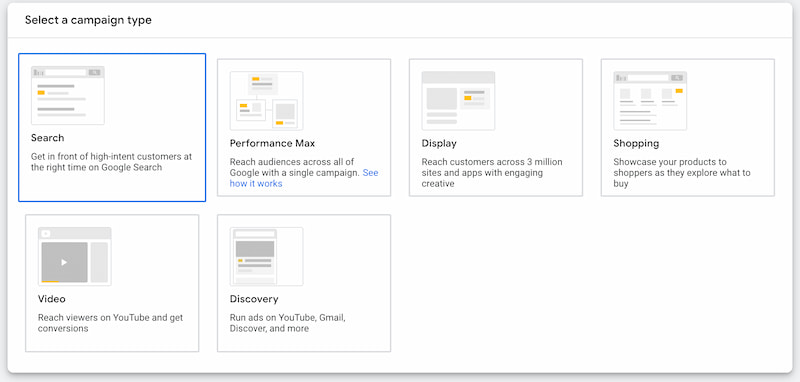
Campaign type
Next, you will need to select a campaign type. You must select Search here as it is the only campaign type you are allowed to create with your Google Ad Grant account.
You may be prompted to “Select the ways you’d like to reach your goal”. You should select a website and add your URL. If you have a phone number, physical location or app, you can select those options too.
Name your campaign and continue.
Bidding
You will be prompted to choose a bidding type.
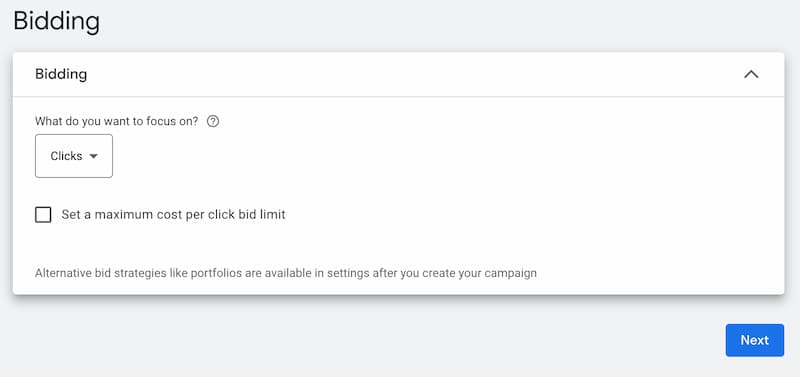
Unless you have set up campaign conversion already (we’ll cover this in step 3), you should select Clicks for now. You don’t need to set a maximum cost-per-click bid; your account will be limited to $2.
Locations
Now you need to set the locations you want to target. Select the location that your ads are relevant for.
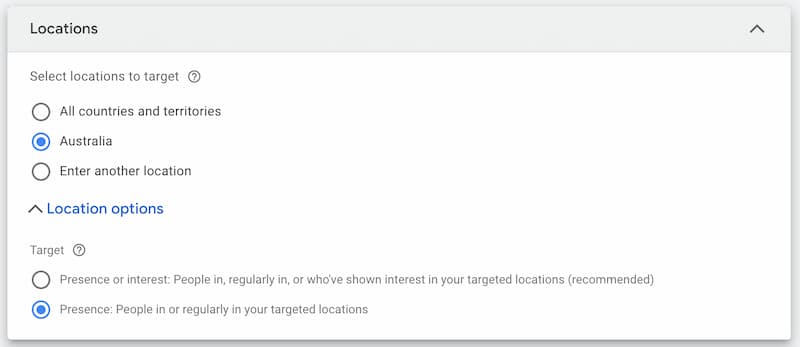
Under Location options, you may want to change the setting to Presence.
Enter keywords
Now is the time to refer to your keyword plan created in Step 1.
Start with the first ad group you want to create from your plan and enter the keywords.
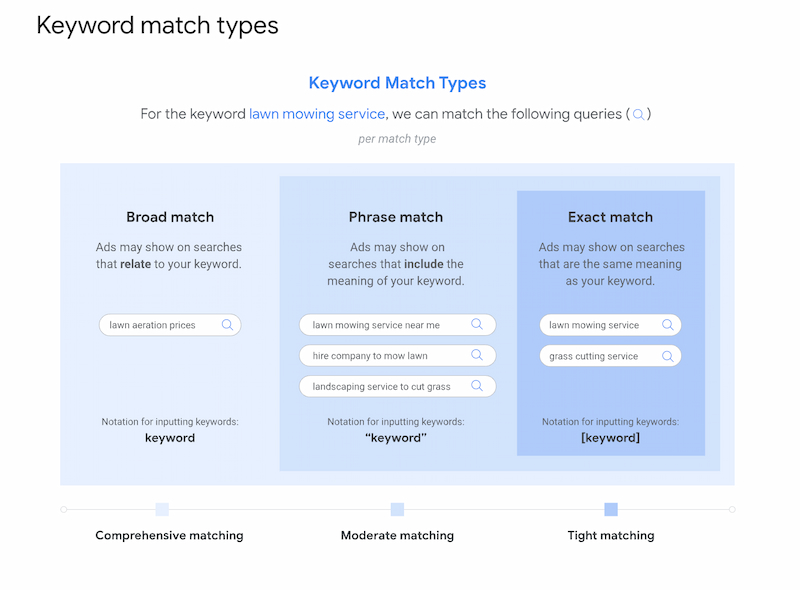
There are three options when entering your keywords, or three match types.
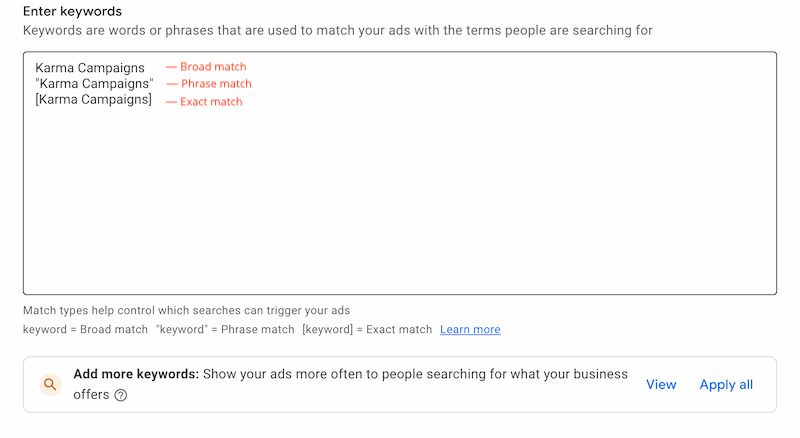
Google gives us this simple explanation about how the match types work.
When first setting up a Google Ad Grant account, I usually recommend using Broad match. This will give your account the best opportunity to start spending Grant money. You may have your ads show for searches that aren’t hugely relevant, but with $10,000 a month to spend, you shouldn’t worry.
If you find your account maxing out is budget, then you can consider tightening the match types and refining the searches you show for.
To use broad match, enter your keywords one per line without quotations of parenthesis.
You can use Semrush’s keyword magic tool to figure out what searches your keywords will match for using different match types.
Creating ads
Now it’s time to create your ads.
Google shows you a helpful bar at the top of the ad creation that assesses the strength of ads as you set them up. Aim for Good or Excellent ad strength.

URL Details
First, enter the URL details. The Final URL is the landing page you want people to end up.
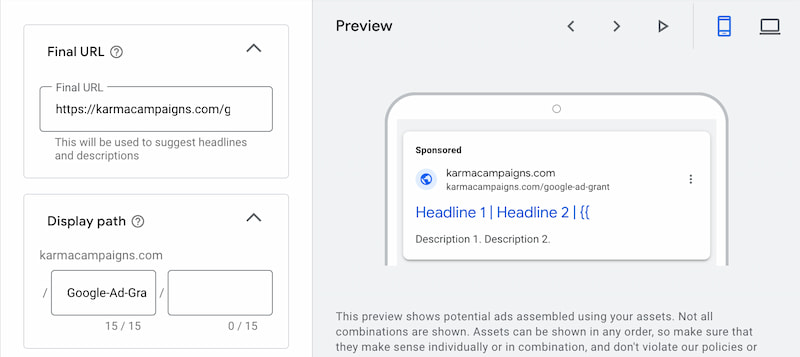
Display path is the URL that will appear in the ad; this doesn’t need to be a real page location and should be something that relates to the keywords of the ad group.
Headlines
Next, add some headlines. Google will mix and match these to create your ads. It’s a good idea to add as many relevant headlines as you can write, and it’s best practice to use title case for headlines.
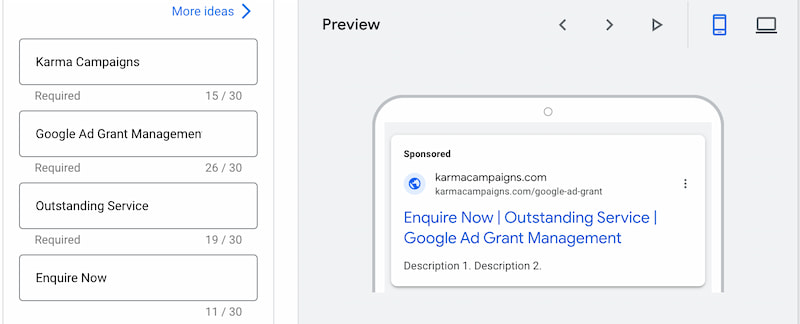
It’s essential that your headlines relate to the theme of your ad group.
Include a variety of headlines and call to action, such as “Sign Up” or “Donate Now.
There are three insertion tools to help create ads that are relevant and engaging. Typing “{{” will bring up these options.
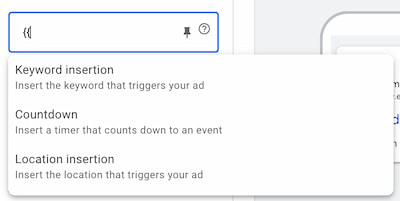
Keyword insertion will insert the Keyword that triggered the ad; Countdown will let you add a countdown to your ad, and Location will ad the Users city, state or country to the ad.
These insertion tools can help give your ad a competitive advantage and a worth using if relevant to your campaign.
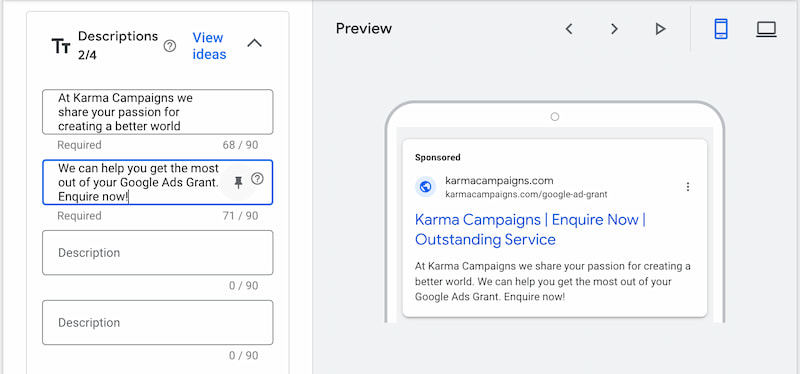
Descriptions
Descriptions work like headlines; Google will mix and match these to create your ads. You can include up to four options.
Extensions
Under Descriptions, you will find Extensions. Extensions let you add lots of different features to your ads which can help improve click-through rates.
You must add two site link extensions to your ad to comply with Google Ad Grant policy. These direct users to different pages on your website.
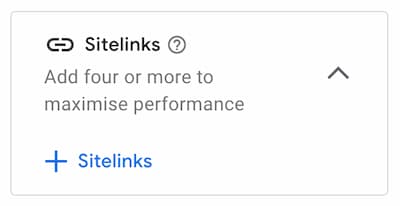
It’s worth setting up as many extensions as are relevant for your organisation. But you can come back and do this later.
Set your budget
Finally, you need to set your budget for your campaign. You have $329 dollars to spend a day. Rather than dividing your budget up among your campaigns. Start by setting the budget for every campaign to $329, this will help your campaigns get more impressions.
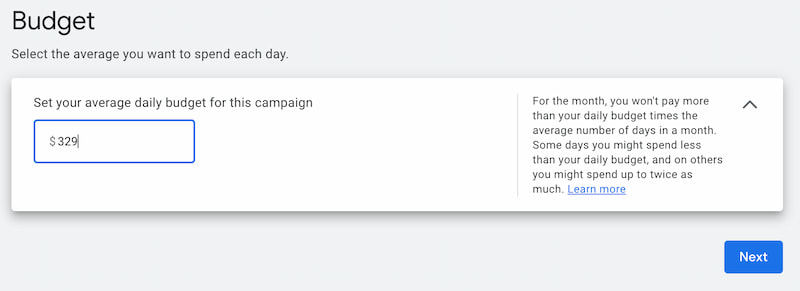
If you find your account regularly spending all of your daily budget, then you can prioritise the spend by campaign.
Your campaign should now be ready to review and publish.
Step 3: Setting up conversions & switching to smart bidding
It’s essential that you set up conversion tracking for your Google Ad Grants account. It’s not just best practice; it’s also a requirement of the program.
For the best performance in your Google Ad Grant account, you should track actions the users may take as they move along your marketing funnel.
Depending on your organisation, some relevant goals for each stage of the funnel could be:
Top-of-funnel :
- Started watching a video on your site
- Quality engagement with your website
- Downloaded an information pdf
Mid-funnel:
- Email click
- Phone number clicks
- Newsletter sign-ups
- Contact form submissions
Bottom-of-funnel:
- Donations
- Event Registration
- Ticket sales
The easiest way to set up conversions is to connect your Google Ads Grant account to Google Analytics and import conversions from there.
Setting up conversion in GA4
Luckily GA4 can track a bunch of engagements with your website, and you just need to ensure it is enabled and set up correctly.
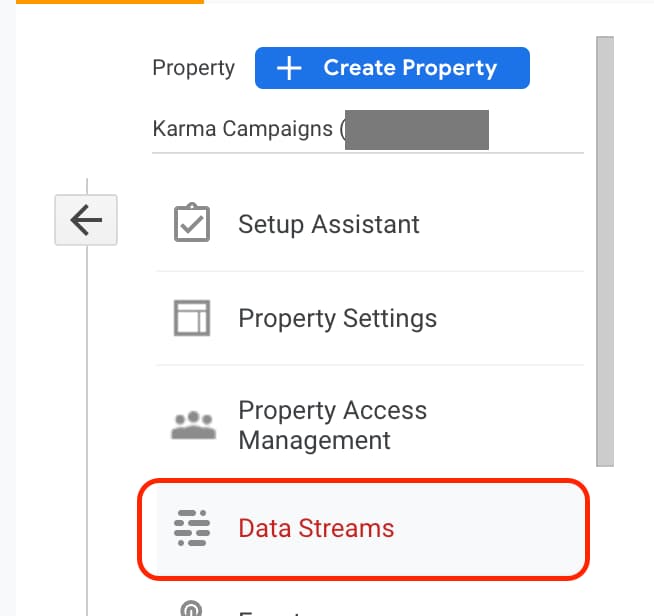
First, find your Data Stream under settings:
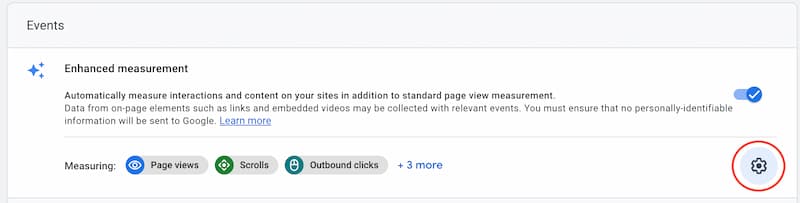
Click into your data stream and find Enhanced measurement; from here, you can toggle on or off events you might like to track, including video engagement, file downloads and scrolls.
You can create other custom events Under Data Streams > Create Custom Events

When creating custom events, you specify the parameters of an event that will trigger the custom event when true.
For example, if you wanted to track every time someone clicks a hyperlinked phone number on your website, you can specify the event_name is “click” and the link_url contains “tel:”.
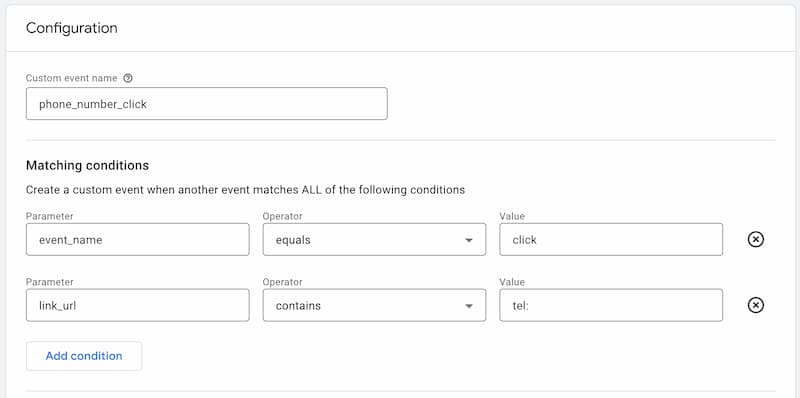
You could use custom events to track email clicks, as above, file downloads of specific files, specific forms or visits to certain pages.
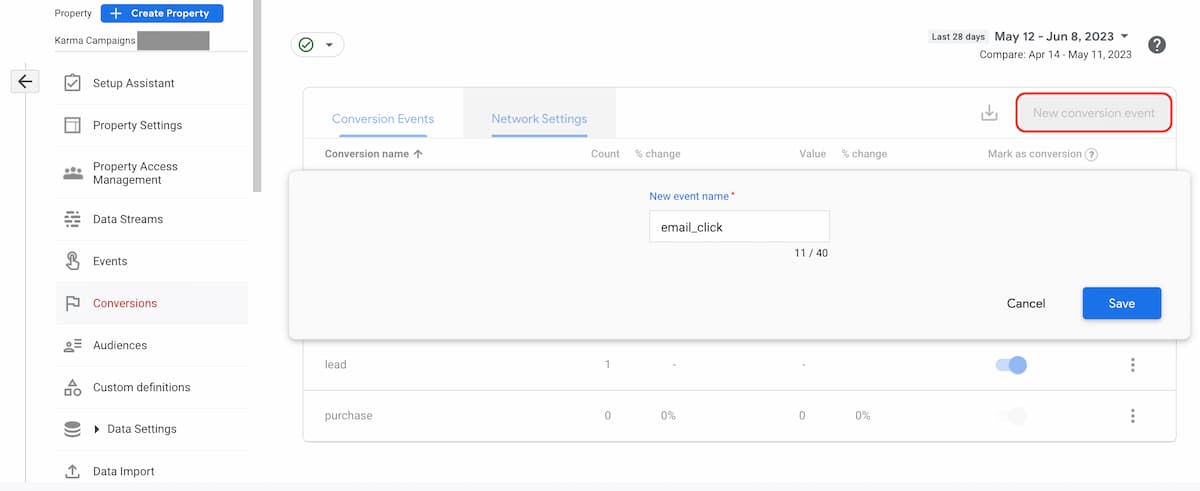
Once you have events set up, you must mark them as conversions. You can do this under the Events tab or under the Conversions tab:
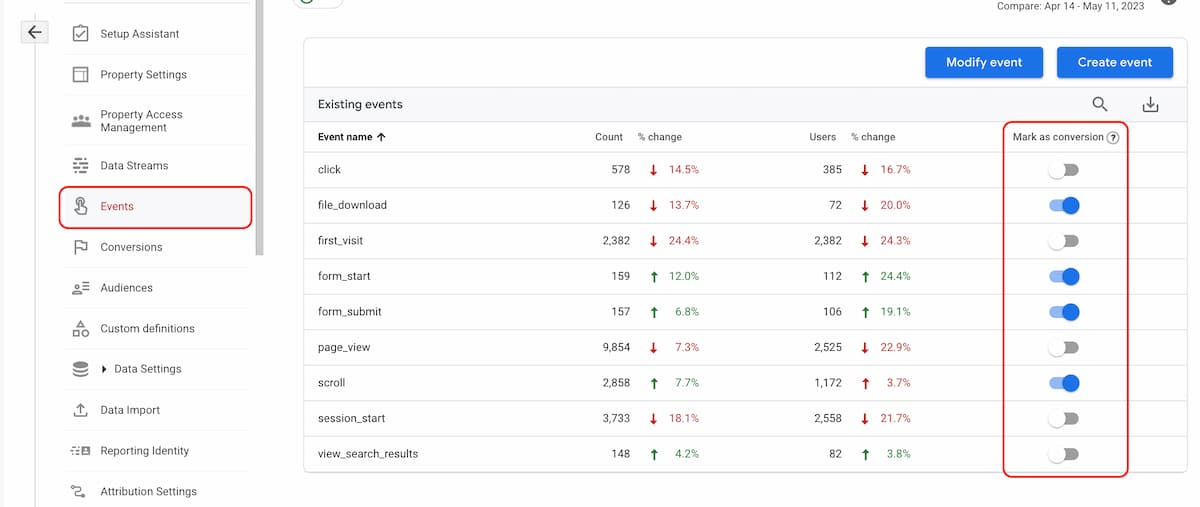
If the event hasn’t received any hits yet, you won’t see it in the list of events. In this case, you can add it under the conversion tab by selecting “New conversion event” and entering the name that you used when you created the event.
Setting up e-commerce tracking
Ideally, you should track if a user makes a payment, such as makes a donation or purchase, with Google Analytics e-commerce tracking features.
Many tools for collecting donations or online sales have Google Analytics e-commerce tracking built-in. Search your platform’s documentation for “Google Analytics” to find instructions.
If you have a custom-built platform or your tools don’t have built-in e-commerce settings, you will need the help of a developer.
Alternatively, you could switch to a fundraising platform that does track donations. If you have a WordPress website, I highly recommend GiveWP.
Link your Google Ads and Google Analytics accounts.
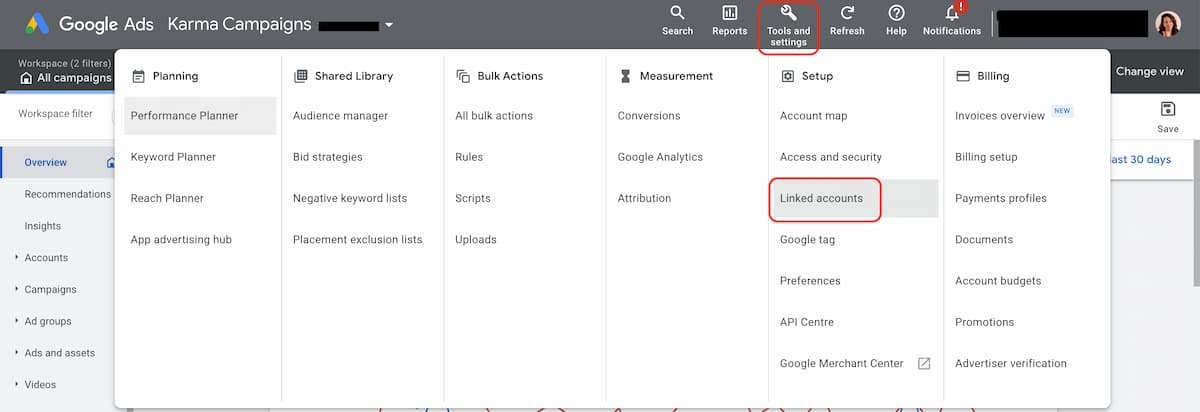
Now that you have your Google Analytics account tracking conversions, you need to connect it to your Google Ads account. You will need to be an admin of both your Ads account and Google Analytics account.
Navigate to Tool and Settings and look for Linked accounts. From there, select GA4 & Firebase and find your account.
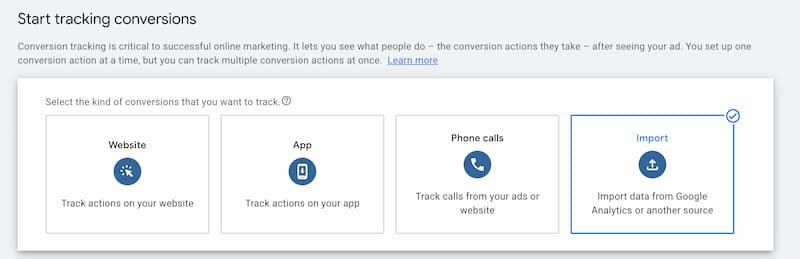
Next, you need to import the conversions. Find conversion under the Tools & Settings > Measurement menu and create a new conversion.
Select Import and find the account you have just connected. You should see the conversions you have set up.
Switch your campaigns to smart bidding.
Now that you are tracking conversion, you can take advantage of smart bidding – it’s a game changer for your account.
With smart bidding enabled, your campaigns are no longer restricted to bidding $2. Google will use its powerful machine learning to get people most likely to convert to your website.
You can change the bidding on a campaign by editing it and finding Change bid strategy,
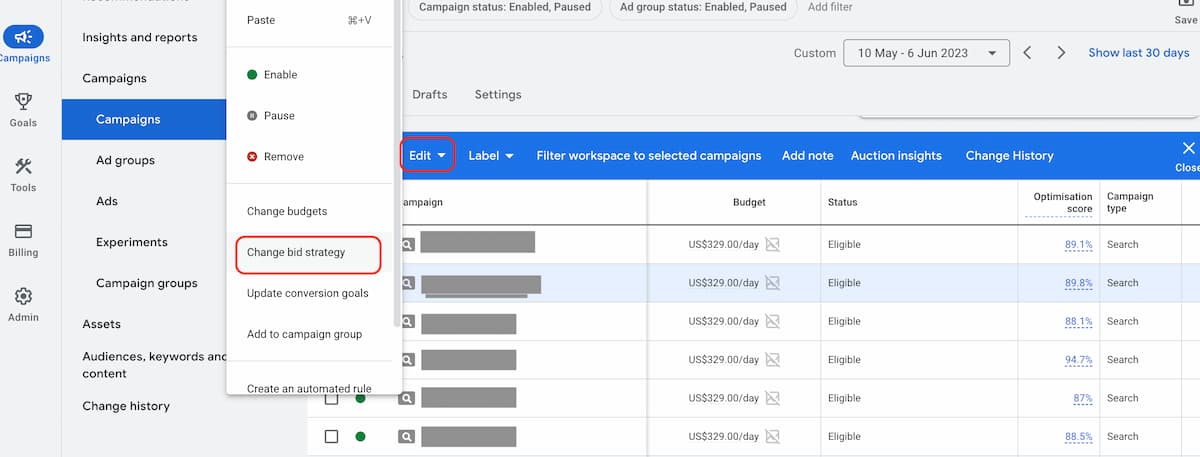
There are a few different smart bidding options. If you are not yet spending the full $329 a day, you want to use Maximise Conversions.
If you are maxing out your budget regularly, you may like to experiment with Target ROAS, Maximise conversion value or Target CPA.
Part 3: Maintaining, Optimising & Maximising your Google Ad Grant Account
Once you have your account up and running, you need to maintain and optimise it to maximise your spend and conversion.
Compliance guidelines
There are a few rules that you need to follow to keep your account active.
Actively maintaining your grant.
You must log in and manger your account monthly and make a change at least every 90 days. If you don’t, your account may be cancelled.
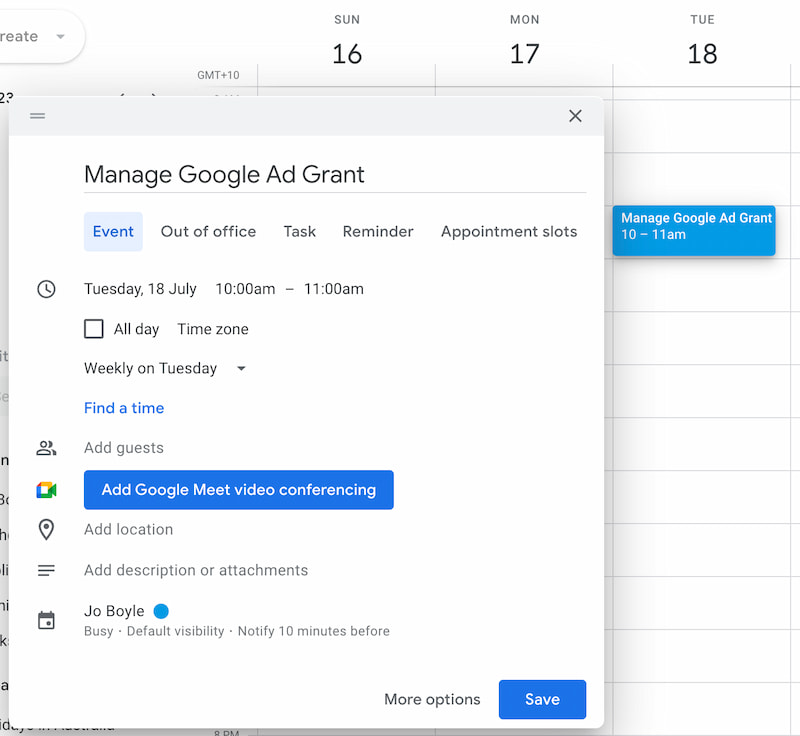
Block out some time in your calendar or set a reminder weekly, fortnightly or monthly to manage your Google Ad Grants account. This will also help you make the most of your account.
No keywords with a quality score of 1 or 2
Google Ads Quality Score is a metric used by Google to assess the quality and relevance of your keywords and ads.
It is a number between 1 to 10 given to each keyword, with 1 being the lowest score and 10 being the highest. It is calculated based on the expected clickthrough rate (CTR), ad relevance and landing page experience.
In Google Ad Grant accounts, no keywords with a quality score of 1 or 2 are allowed.
To check the quality score of your keywords:
- Navigate to Campaigns > Audiences, Keywords & Content > Search keywords.
- Select columns > modify columns.
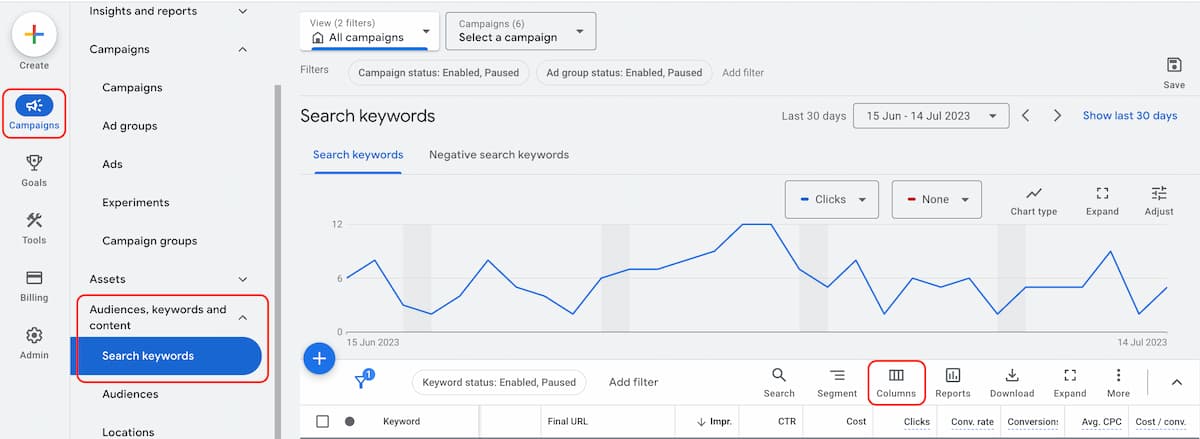
- Search for quality score and check the boxes for quality score and its components.
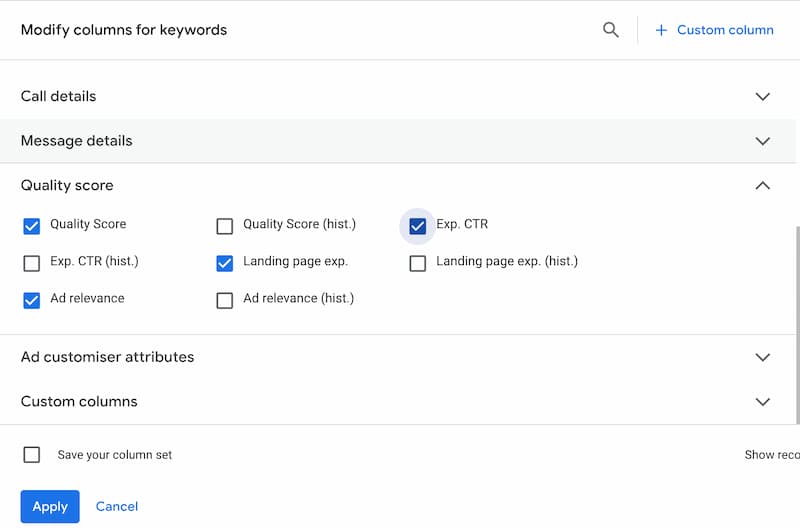
The Quality score of each keyword and its components will then appear in your report. You can find and pause keywords with a quality score of 1 or 2 by selecting it and changing its status from enabled to paused.

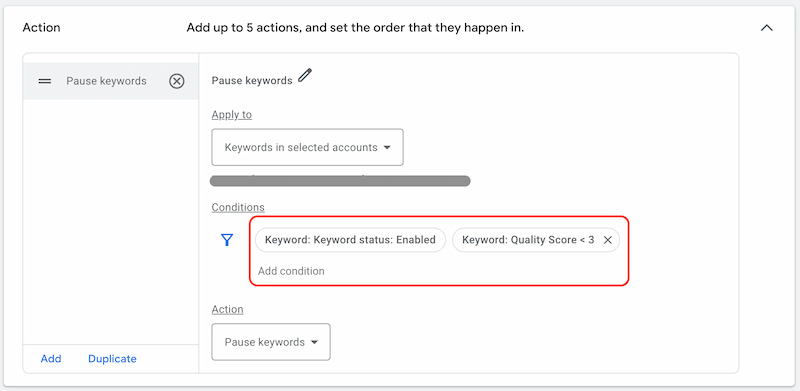
Create an automated rule to pause keywords with a quality score of 1 or 2
The simplest way to ensure you are meeting the policy is to set up an automated rule to pause keywords with a score of one or two.
- Navigate to Tools > Bulk actions > Rules
- Select New rule > Keyword rule
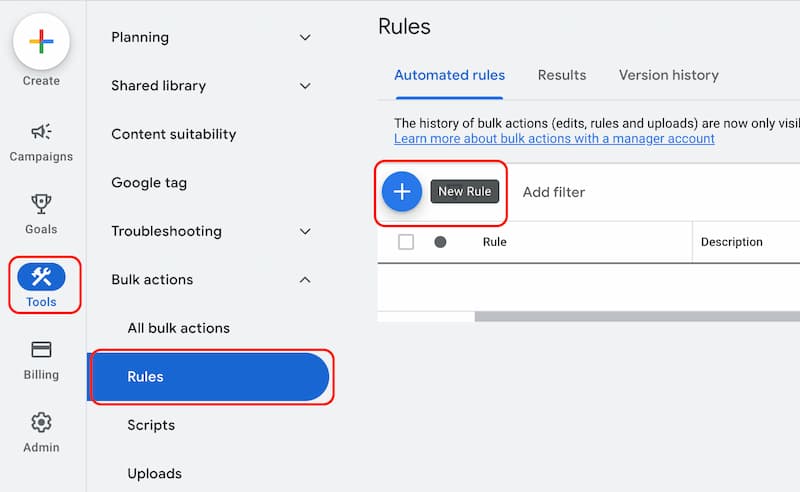
Add a condition that checks if a keyword quality score is less than three and set the frequency you want the automation to run, if you want to receive an email notification and then save the rule.
Maintain a click-through rate above 5%
Click-through rate (CTR) is calculated by dividing the number of clicks on your ads by how many times people see your ads.
clicks ÷ impressions = CTR
In a Google Ad Grant account, you must have an overall CTR of 5%.
To find the CTR of your account, navigate to your account Overview. One of the four metric boxes should have CTR; if it doesn’t, you can select it from the dropdown.
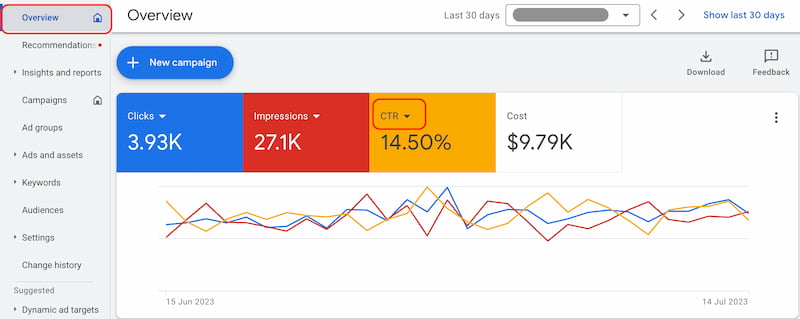
If your CTR is less than 5%, look for campaigns, ad groups or keywords that are performing poorly and pause or improve them.
Respond to the program survey
This is simple but essential. Google Ad Grants will send you a survey, and you must respond. Make sure you monitor the email account it comes to.
![How to get petition signatures with Facebook Ads [2023 guide]](https://karmacampaigns.com/wp-content/uploads/2022/03/SignatureGaryKnight.jpg)

![Digital Marketing for Nonprofits: Definitive Guide [2023]](https://karmacampaigns.com/wp-content/uploads/2022/06/Blog-hero-digital-marketing-nonprofits-768x518.jpeg)